|
|
|
Kool
Clip-Art Kool Moves and Flash - Related
Tutorials
|
|
All
.fun files presented on this site are original works made with Kool
Moves © 2004 Propellerhead-Graphix, PO Box 14, Capac, MI, 48014
|
|
|
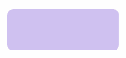
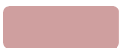
Start by adding a shape to your Kool Moves movie. In this case a blue rectangle, to use as a button (shown below).
Turn a Shape into a Mouseover
Learn how to create a Simple Shape Mouseover with Kool Moves
The tutorial above may involve the use of some actionscript, html, and the like, but are not necessarily intended to teach them. These tutorials are intended to familiarize new users to the Kool Moves interface and contain simplified examples of how to perform specific tasks in Kool Moves as they would relate to the use of materials from this site. Suggested examples contained within these tutorials may not necessarily be the "best" way to accomplish a task, but they do accomplish the job at hand. These tutorials are not an attempt to copy already existing tutorials. In some instances, more detailed tutorials on actionscript and the use of the Kool Moves tool are available at the Support page on the Kool Moves web site.
Turning a shape into a mouseover can add a touch of interactivity to any movie. Creating a simple mouseover with Kool Moves is relatively easy once you learn how. This tutorial explains only the steps involved in making a shape into a mouseover. For a better understanding of mouseovers, you may want to review the for some basic information.
Add a blue rectangle to your movie.
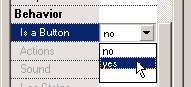
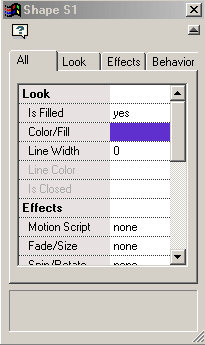
To create the mouseover, double-click on the blue rectangle to open the Properties Dialog Box (Fig. 1).
Scroll down, under Behavior and click Is a Button > Yes. to convert the shape to a button.
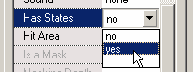
Scroll down some more, click Has States > Yes
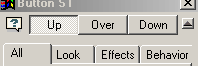
Kool Moves will now add three states to your shape. The properties Dialog box will change to reflect that the shape has these three states by adding buttons for editing the Up, Over, and Down states (illustrated below).
Click the Over button to select the over state for your shape.
Top of Properties Dialog Box
Dialog Box with States Buttons added
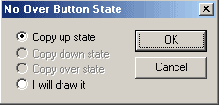
The Button State dialog will open (shown below) and two options will be available. "Copy up state" will place an exact copy of your Up state to the Over state's stage. "I will draw it" will allow you to draw a new shape. We are going to copy the Up state.
Select Copy up state from the Button State dialog (shown below). Then click OK. (This will place an exact copy of your Up state to the Over state stage.)
Now, we create some contrast for our mouseover by editing the Over state. On the editing stage, double click the copied shape and select Color/Fill from the editing dialog to change the color of the copied rectangle to dark yellow (shown below).
The top of the stage (editing area) will change to reflect that you are now editing the Over State for your shape. (illustrated below)
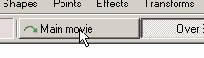
Click the Main Movie button at the top of the stage to return to the main Movie.
Double click the blue rectangle on your main movie again to re-open the Properties Dialog Box.
This time, choose the Down button to edit the down state for your shape.
Repeating steps 4, 5, and 6 (from above), create some contrast for your down state (my example is below), then exit back to the Main Movie.
Create contrast by changing the color of the "over" copy of the original shape.
Create contrast by changing the color of the down copy of the original shape.
Preview your Mouseover by selecting Play > Play in Web Browser from the menu at top, and pass your mouse over the shape to see that it works.
Note: You can edit the text for the Over and Down button states in any way you wish (changing the color or even drawing a new shape) to acheive the contrast and look you want. What you choose is up to you.
The stage area will change to reflect the editing area for the "over" state of your shape, showing a faded snapshot of the up state from the main movie to use as a guide for positioning.
A faded snapshot of your Up state will appear on the Over state stage to aid you with positioning
For the mouseover to work you must now add a mouseover Action to your text object. In the Main Movie, double-click on your text to re-open the Properties Dialog box. Scroll down and click on Actions, then click on the little box that appears to the right to open up the
Scroll down and click on Actions
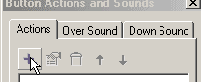
Then click on the little box that appears to the right to open up the Button Actions and Sounds dialog box.
In the Button Actions and Sounds dialog box, on the Actions tab, click the (+) sign to open the dropdown menu..
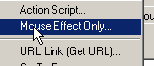
From the dropdown menu, choose Mouse Effect Only.
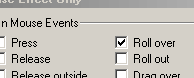
From the Mouse Effect dialog, check Roll over, then click OK to exit the dialog.
Close the remaining dialog boxes to exit back to the main Movie.